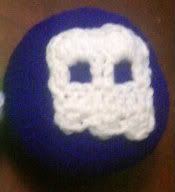
Special thanks to testers: Michelle of The Perfect Knot, Cara of HeritageHeartcraft, Christine of PickleWhat Crochet, Jan of Fairy Dust Creationz, and Ellamay J.


 Pattern and photos are Copyright © 2012/2013 Lillian Minneman - Just Stitched. Pattern shall remain free, and may not be reproduced or sold. Feel free to link to this pattern!
Materials:
G/6/4.25mm Hook
WW Yarn in White (or desired color)
Notes:
Ch2 counts as 1st DC.
It is important to remember your last DC in rows 2-4 will be in the top of the ch2 (1st DC) of the previous row.
Slsts worked in the foundation chain counts as a stitch.
Basic Skull
To begin, chain 10
Row 1: DC in 3rd ch from hook. DC in next st, slst in next. DC in next st, 2DC in next st, slst in next st. DC in next st, 2DC AND slst in last st. (12 st)
Row 2: Rotate your piece so you are now working across the back side of beginning chs. Ch2. DC in same as ch2. DC across. (10)
Row 3: Ch2, turn. DC in next st. Ch2, skip 2 st, DC in next 2 st. Ch2, skip 2 st, DC in last 2 st. (6 DC + 2 ch2 sp)
Row 4: Ch2, turn, DC in next st, 4DC in chain space, DC in next 2, 4DC in chain space. Dc in next st. Ch2, slst in last st. (14 DC)
F/O. leaving long tail for sewing. Weave in beginning end. Sew on.
Variation 1: Slightly Sinister Eyes
Follow beginning of basic skull pattern to row 2.
Row 3: Ch2, turn. DC in next st. Ch2, skip 2 st, sc in next 2 st. Ch2, skip 2 st, DC in last 2 st.
Finish pattern as written.
Variation 2: Evil Eyes
Note: Slst worked in this row count as a st.
Follow beginning - row 2.
Row 3: Ch2, turn. DC in next st. Ch2, skip 2 st, slst in next 2 st. Ch2, skip 2 st, DC in last 2 st.
Finish pattern as written.
Variation 3: Monster Teeth
Note: Row 1 uses a picot stitch to create a point on each tooth. To create a picot, Ch3, then slst in 1st ch made.
To begin, chain 10
Row 1: DC in 3rd ch from hook. Picot. DC in next ch. Slst in next ch. DC in next st. Picot. 2DC in next ch, slst in next ch. DC in next ch. Picot. 2DC and slst in last st. (12 stitches, and 3 picots.)
Finish pattern as written.
Other ideas:
Use Tr stitches in row 3 of Variations 1 & 2.
Add extra rows between Row 2 & 3.
Add extra rows after Row 4.
Use ideas from above in endless combination!