Monday, January 30, 2012

Free Pattern: Beanie with Bill [Original]

A lot of people noted that the pattern for this ran a little small. Please see the rewritten version here.
Beanie with Bill, Chunky.
By Lily M.

Materials:
Super Bulky Yarn (Lion Brand Wool-Ease® Thick & Quick®)
K Hook

Notes: Count Ch2 as 1st DC in each round.

Beginning: IN MC, CH2 (Counts as 1st DC), DC 9 (10DC). Pull tight to close. SlSt in top of Ch2.
Round 1: Slst in next DC, Ch2. DC in same st as CH2. 2DC around. (20DC) Slst in top of Ch2.
Round 2: Slst in next DC, Ch2. DC in same st as Ch2, DC in next st. *2DC in next, 1DC in next* around. (30DC) Slst in top of Ch2.
Round 3: Slst in next DC, Ch2. DC in same st as Ch2, DC in next 2 sts. *2DC in next, 1DC in next 2st* around. (40DC) Slst in top of Ch2.
Round 4: Slst in next DC, Ch2. DC around (40st) Slst in top of Ch2.
Round 5: Slst in next DC, Ch2. DC around (40st) Slst in top of Ch2.
Round 6: Slst in next DC, Ch2. DC around (40st) Slst in top of Ch2.
[Stop here for 0-12mo, Skip to Brim.]
Round 7: Slst in next DC, Ch2. DC around (40st) Slst in top of Ch2.
Round 8: Slst in next DC, Ch2. DC around (40st) Slst in top of Ch2.
[**Untested** Stop here for 12mo-4yr, Skip to Brim.]
Round 9: Slst in next DC, Ch2. DC around (40st) Slst in top of Ch2.
Round 10: Slst in next DC, Ch2. DC around (40st) Slst in top of Ch2.

Infant/Child Brim:
Row 1: CH2, DC in FLO in next 9 ST. (10DC) SlSt in next st, Turn. (Do not ch.)
Row 2: *DC in st, 2DC in in next* Repeat 3 times, DC in next 2, SLst in next, SlSt down side of 1 st, slst in next st (last round of hat).

Adult Brim:
Row 1: CH2, DC in FLO in next 14 ST. (15DC) SlSt in next st, Turn. (Do not ch.)
Row 2: *DC in st, 2DC in in next* Repeat until end (21DC), SLst in next, Turn. (Do not ch.)
Row 3: DC across. (19DC) SlSt in last st. SlST down side (2 st), slst in next st (last round of hat).

Find me at:
http://www.facebook.com/pages/Just-Stitched/308561265852550
http://www.ravelry.com/people/LilyPants
http://juststitched.tumblr.com
http://juststitched.blogspot.com

Friday, January 6, 2012

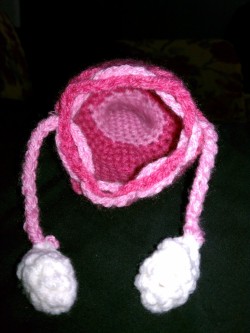
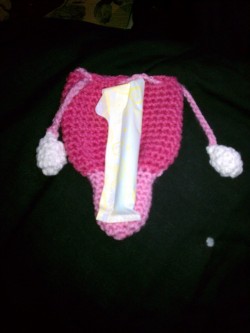
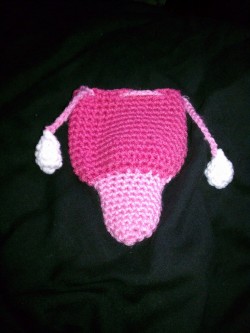
Free Pattern: Uterus Drawstring Bag

Perfect for storing feminine hygiene products while on the go (Tampax Pearl Shown), or as a gag gift for new or expecting mothers!

Uterus Drawstring Bag   Download the pdf here!

Pattern and photo are copyright 2012 Lillian Minneman - Just Stitched. All rights reserved. If you plan to sell this item, please provide a link back to the pattern or credit the designer.

Like this?? Share it!
Pin It Share on Tumblr

Materials:
Hook H
Worsted Weight Yarn in Light Pink, Dark Pink, White
Yarn Needle

Key:
Color 1: Light Pink
Color 2: Dark Pink
Color 3: White

Vagina” Color 1/Light Pink
Round 1: Magic Circle 6 (6)
Round 2: 2sc in each st (12)
Round 3: [2sc in stitch, 1sc in next stitch] (18)
Rounds 4-12: sc in each stitch - 18

Uterus” Switch to Color 2/Dark Pink
Round 13: [2sc in stitch, 1sc in next stitch] - 27
Round 14: 1sc in next stitch, [2sc in stitch, 1sc in next stitch] 13 times (40)
Rounds 15-16: 40
Round 17: sc in next 4 st, [Sc2tog, Sc in next 4]6 times (34)
Round 18-25: Sc around – 34
Round 26: Ch2, sk2, Sc in 2 st, [ch2, sk2, sc in 3 st] around.] F/O
(Note: You may want to add another round of plain or decorative stitch above round 26.)

Ovaries” Make 2 in Color 3/White
Round 1: Magic Circle 4
Round 2: 2sc in each (8)
Rounds 3-4: Sc around (8) Stuff, if desired.
Round 5: 1 sc, sc2tog (4)
Round 6: sc2tog around. Leave tail for sewing.

Drawstring “Fallopian Tube” in Color 1/Light Pink
Chain 70. Attach one Ovary to end.
Weave other end in & out through last round of Uterus, ending with one end across from the other. Attach Ovary to other end.
Weave in ends.
Find me at:
http://www.facebook.com/pages/Just-Stitched/308561265852550
http://www.ravelry.com/people/LilyPants
http://juststitched.tumblr.com
http://juststitched.blogspot.com
Wednesday, January 4, 2012

Free Pattern: Crocheted Nook Simple Touch Cover

Pattern and photo are copyright 2012 Lillian Minneman - Just Stitched. All rights reserved. If you plan to sell this item, please provide a link back to the pattern or credit the designer.
Materials: H/8/5.00mm Hook
Worsted Weight 4-Ply Cotton
Yarn Needle
Scissors
1 or 2 Medium-Large size buttons
Sewing Needle & Thread
Washer, Dryer
Any Embellishments
Washing Machine, Dryer

Stitches Used: (U.S. Terms)
Half Double Crochet: Yarn over. Insert hook into stitch. Yarn over, pull through stitch. (3 loops on hook) Yarn over. Pull through all 3 loops. (You should have 1 loop on your hook.
Triple Crochet: Yarn over 2 times. Insert hook into stitch. Yarn over, pull through stitch. (4 loops on hook.) Yarn over, pull through 2 loops. (3 loops on hook.) Yarn over, pull through 2 loops. (2 loops on hook.) Yarn over, pull through last 2 loops. (You should have 1 loop on your hook.)
Double Triple Crochet: Yarn over 3 times. Insert hook into stitch. Yarn over, pull through stitch. (5 loops on hook.) Yarn over, pull through 2 loops. (4 loops on hook.) Yarn over, pull through 2 loops. (3 loops on hook.) Yarn over, pull through 2 loops. (2 loops on hook.) Yarn over, pull through last 2 loops on hook. (You should have 1 loop on your hook.)

Notes:
Work in continuous rounds until 20b.
Cover will be bigger than your Nook Simple Touch as you work it, to allow for shrinkage when washed & dried. If you do not plan to wash/dry (or are using yarn that doesn't shrink), start using 4 or 5 fewer chains and adapt pattern as you see fit.

Pattern:
Chain 20
Round 1: HDC in first back bump, and next 18 across, 3HDC in last bump. (22HDC)
Going down other side of chain, HDC in each across, 3HDC in last st (21HDC)
Place your marker, so you will know which side begins a new round.
Rounds 2-20a: HDC around (43)

Begin Working in rows.
20b: HDC to the end of the row (19), chain 2, turn.
Rows 1-7: HDC across (19), chain 2, turn

In row 8, you will create your buttonholes. (If you'd like any.)
If your buttons are on the larger side, do a double-triple crochet instead of a triple crochet.
Row 8 for two buttonholes: HDC 5, TC 2, HDC 5, TC 2, HDC 5
Row 8 for one buttonhole: HDC 8, TC 3, HDC 8
F/O, weave in ends.

Wash on cold, dry regular (with heat.)
Once dry, sew button(s) in appropriate place. Embellish as desired.

Embellishment Ideas:
Thread a ribbon through the 2nd row of stitches at the top.
Add an applique.
Add a decorative stitch around the flap.

Other ideas:
Add a short strap for a child-size purse!
Add two straps for a child-size backpack!

Find me at:
http://www.facebook.com/pages/Just-Stitched/308561265852550
http://www.ravelry.com/people/LilyPants
http://juststitched.tumblr.com
http://juststitched.blogspot.com