Thursday, November 29, 2012

Free Pattern: Naruto Sleeping Cap (Versatile Stocking Cap)

The Holidays are here, and I'm frantically working up Christmas presents. I thought I started early, but my list keeps getting longer and longer. I was thinking about making another Santa-esque hat, but I couldn't find a pattern I REALLY liked. Then, while browsing hat patterns, I saw a variation someone did of that hat, only it was Naruto's Sleeping Hat. I, myself, have never seen Naruto, but I know two of my brothers have watched it, and one of them once mentioned this hat to me. I looked it up (whenever that was), but got busy and forgot about it. Until now!

This hat is made in the continuous round. Please read the pattern in full before beginning. Feel free to contact me for any questions. It can be made with round eyes, or squinty eyes (not pictured). Pattern for each is included.

More photos below. Pattern and photos are Copyright © 2012 Lillian Minneman - Just Stitched. Pattern shall remain free, and may not be reproduced or sold. Naruto is copyright Masashi Kishimoto/Hayato Date/Shueisha/Studio Pierrot/TV Tokyo/Viz Media. No copyright infringement intended.


Materials:
J/6.00mm Hook
WW yarn in black
WW yarn in white
Small amount of polyfil or stuffing
Stitch Marker (strongly recommended)
Yarn Needle
Scissors

Key:
CH - Chain
HDC - Half Double Crochet
SC - Single Crochet
SLST - Slip Stitch
ST - Stitch
SC2tog - Decrease
MR - Magic Ring/Magic Circle
F/O - finish off HDC2tog - Half Double Crochet Decrease (Yarn Over, insert hook into stitch. Yarn Over, pull up loop. Yarn over, insert hook into next stitch. Yarn over, pull up loop. Yarn over, pull through all loops on hook.

Hat: Beginning in white
Ch65, join (be careful not to twist!)
Rounds 1-4: HDC around (65) Switch to black at the end of round 4. (I highly recommend using a stitch marker to mark the end of each round as you go, because black is a difficult color to see!)
Rounds 5-14: HDC around (65)
Round 15: HDC2tog, HDC in next 3 (HDC2tog, HDC in next 8) around (58)
Round 16: HDC2tog, HDC in next 1 (HDC2tog, HDC in next 3) around (46)
Round 17-19: HDC around (46)
Round 20: HDC2tog, (HDC2tog, HDC in next 9) around (41)
Round 21-23: HDC around (41)
Round 24: HDC2tog, HDC in next 3, (HDC2tog, HDC in next 7) around (36)
Round 25-27: HDC around (36)
Round 28: (HDC2tog, HDC in next 4) around (30)
Round 29-31: HDC around (30)
Round 32: (HDC2tog, HDC in next 3) around (24)
Round 33-35: HDC around (24)
Round 36: (HDC2tog, HDC in next 2) around (18)
Round 37-39: HDC around (18)
Round 40: (HDC2tog, HDC in next) around (12)
Round 41-43: HDC around (12)
Round 44: (HDC2tog) around (6)
Round 45-47: HDC around (6)
F/O, leave tail for sewing

Ball: In white
Round 1: SC6 in MR (6)
Round 2: 2sc around (12)
Round 3: sc ar (12)
Round 4: sc2tog, 1sc (8)
Round 5: sc2tog around (4)
F/O, leave tail for sewing

Teeth: In white
Attach yarn in desired area of hat with a SLST.
Row 1: HDC in same stitch as SLST, and in next 4. CH1, turn.
Row 2: HDC across (5) F/O.
Attach Yarn in 12th st from first tooth with a SLST.
Repeat Rows 1 & 2 above. F/O. Weave in ends.

Nose: In black
Round 1: sc4 in MR (4)
Round 2: *2sc in next, sc in next* twice (6)
Round 3: 2sc around (12)
Round 4: Sc around (12)
F/O, leave tail for sewing.
Center between two teeth, and sew on half on the white and half on the black.

Round Eyes: (Make 2 in white)
Round 1: SC6 in MR (6)
Round 2: 2sc around (12)
Round 3: *2sc, 1sc* around (18)
F/O, weave in ends.

Round Eye Pupils: (Make 2 in Black)
SC5 in MR. Join with SLST.
F/O, leave tail for sewing.

Half Circle Eyes: (Make 2 in White)
Row 1: sc 3 in MR. When pulling tight, keep all stitches to one side.
Row 2: ch1, turn. 2sc across. (6)
Row 3: ch 1, turn. (Sc in st, 2sc in next) across (9)
Sc evenly across flat side, skipping the center of first row. (3)
SC in first stitch of Row 3. F/O.

Half Circle Eye Pupils: (Make 2 in Black.)
SC3 in MR. Join with SLST.
F/O, leave tail for sewing.


Find me at:
http://www.facebook.com/pages/Just-Stitched/308561265852550
http://www.ravelry.com/people/LilyPants
http://juststitched.tumblr.com
http://juststitched.blogspot.com

Wednesday, October 24, 2012

Free Pattern: Miniature Top Hat

A friend of mine and I have been bouncing ideas off each other, creating new patterns, and such, and I came up with this miniature top hat for an upcoming project! Something good about this is that it's really basic, but it's also easily customizable. You can make it bigger, taller, wider brim, add some tiny eyes and a little felt mustache....anything goes!


Pattern and photos are Copyright © 2012 Lillian Minneman - Just Stitched. Pattern shall remain free, and may not be reproduced or sold. Feel free to link to this pattern.

The Miniature Top Hat is made in the continuous round. Please read the pattern in full before beginning. Feel free to contact me for any questions.

Materials:
G/4.25mm Hook
WW yarn in black (or color of your choice)
Yarn Needle
Scissors

Miniature Top Hat
Round 1: sc6 in magic circle (6)
Round 2: 2sc in each st around (12)
Round 3: sc around in BLO (12)
Rounds 4-6: work in both loops, sc around (12)
Round 7: 2sc in FLO around (24)
Join to first sc of last round
F/O, weave in end.

Find me at:
http://www.facebook.com/pages/Just-Stitched/308561265852550
http://www.ravelry.com/people/LilyPants
http://juststitched.tumblr.com
http://juststitched.blogspot.com

Monday, October 22, 2012

Pattern Reading: Abbreviations List

This is a quick guide for pattern-reading. This will only tell you what each abbreviation stands for, not how to perform the instruction. Feel free to ask questions, though, I'd be more than happy to help!

I took the time to type out every abbreviation and description on my own. Please do not copy and paste this list anywhere, or claim it as your own. Feel free to link back.

Stitches:
For stitch abbreviations with instructions, see http://juststitched.blogspot.com/2012/02/stitch-cheat-sheet.html
ch - chain
slst - slip stitch
sc - single crochet
dc - double crochet
hdc - half double crochet
dtr - double triple crochet
fpdc - front post double crochet
bpdc - back post double crochet
c, cl - cluster
lp st - loop stitch
p - picot
pop or pc - popcorn stitch
rsc - reverse single crochet
tr - triple crochet
croc st - crocodile stitch

Materials:
WW - Worsted Weight
hk, hks - hook, hooks

Instructions:
[], (), ** - repeat instructions within
alt - alternate
beg - beginning
bet, btwn - between
blo - back loop only
CC - contrasting color
ch-sp - chain space
cont - continue
dec - decrease
inc - increase
f/o - finish off
flo - front loop only
foll - following
lp, lps - loop, loops
MC - main color
mm - move marker
R - row, or round
rem - remaining
rep - repeat
RS - right side
rnd - round
rev - reverse
pat - pattern
pm - place marker
sc2tog - single crochet 2 together
sk - skip
st - stitch
sp - space
tog - together
tch, t-ch - turning chain
ws - wrong side
yo - yarn over
yoh - yarn over hook

Find me at:
http://www.facebook.com/pages/Just-Stitched/308561265852550
http://www.ravelry.com/people/LilyPants
http://juststitched.tumblr.com
http://juststitched.blogspot.com

Tuesday, August 28, 2012

Free Pattern: Clippy (Microsoft Office Assistant)

Earlier this year, I saw a photo of a crocheted Clippy, and thought, "I need that pattern!!!" Then I had a second thought of, "Why do I need a pattern for that? I can make it myself!" And it ended up being really easy! So, here it is: a Crocheted Clippy!

Pattern and photos are Copyright © 2012 Lillian Minneman - Just Stitched. Pattern shall remain free, and may not be reproduced or sold. Feel free to link to this pattern. Clippy is copyright to its respective owners. No copyright infringement intended.

Clippy is made in the continuous round. Please read the pattern in full before beginning. Feel free to contact me for any questions.

Materials:
F or G Hook (whichever you prefer)
2 Pipe Cleaners
WW Yarn in Grey
WW Yarn in Black
WW Yarn in White
Optional: Small amount of fiberfill

Before beginning, attach pipe cleaners together, so you have one long pipe cleaner. You can try using Hot Glue, but I just twisted the two ends together. You may also want to bend the ends of each pipe cleaner so it doesn't poke through your crochet. Make sure you crochet around the pipe cleaners as you go, because it's difficult to add it at the end - trust me!

Body: in grey
Note: If you choose to use fiberfill, stuff LIGHTLY as you go!
Round 1: sc5 in magic circle
Round 2: sc around. (5)
(Optional Round 2: 2sc in each st around [10])
Round 3: sc around. (5)
Repeat round 3 until your crochet completely covers your pipe cleaners.
Last Round: Sc2tog around.
f/o.

Eye Whites: make 2
Round 1: sc 4 in magic circle
Round 2: 2sc in each st around (8)
Round 3: *2sc in 1 st, 1sc* (12)
f/o.

Pupils: 2 in black
Round 1: sc 4 in magic circle.
f/o.

Eyebrows: 2 in black
Row 1: Chain 10
Row 2: DC in next 2, HDC in next 3, SC in last 4.
f/o.

Assembly: Use the photo as a guide for bending. Sew the eyes and eyebrows on where you see fit.

If I forgot anything, or something doesn't make sense, please contact me!

Find me at:
http://www.facebook.com/pages/Just-Stitched/308561265852550
http://www.ravelry.com/people/LilyPants
http://juststitched.tumblr.com
http://juststitched.blogspot.com

Monday, July 16, 2012

Free Pattern: Customizable Skull Applique (Updated April 15, 2013)

This is a great little applique to use if you're making Super Mario Mushrooms - it's perfect for the top of the purple mushroom! It's really versatile, so it's really easy to customize it to your liking!I paired mine with Linda Potts/Wolfdreamer's Mario Brother Mushrooms Pattern
This pattern was revised and updated.

Pattern and photos are Copyright © 2012 Lillian Minneman - Just Stitched. Pattern shall remain free, and may not be reproduced or sold. Feel free to link to this pattern.
Materials:
G/6/4.25mm Hook
WW Yarn in White

Row 1: Chain 10
Row 2: DC in 3rd ch from hook, DC in next, slst in next, *DC in next 2st, slst in next st* (9 st)
Row 3: Ch2, turn. Working across back side of beginning chs, DC across (8)
Row 4: Ch2, turn, DC in same st as ch2, ch2, skip 2 st, DC in next 2 st, Ch2, 2DC in last st. (5 DC)
Row 5: Ch2, turn, DC in next st, 4DC in chain space, DC in next 2, 4DC in chain space, Ch2, slst in last st.
F/O. leaving long tail for sewing. Weave in beginning end. Sew on.

Here's a few ways to customize:
In Row 2, add a picot between the DC's to make pointed teeth.
Add extra rows between Row 3 & 4.
In row 4, instead of DC (bolded text), SC or slst for slightly sinister-looking eyes.
Add extra rows after Row 5.

The possibilities are endless! Have fun!

If I forgot anything, or something doesn't make sense, please contact me!

Find me at:
http://www.facebook.com/pages/Just-Stitched/308561265852550
http://www.ravelry.com/designers/just-stitched
http://juststitched.tumblr.com
http://juststitched.blogspot.com

Sunday, July 1, 2012

Free Pattern: Minnie Mouse

A friend of mine invited me to her daughter's 2nd birthday. When it finally got closer, I realized I had NO idea what sort of things she liked. So I asked, and Minnie Mouse was the most appealing answer. I decided to make Minnie Mouse - but I was on sort of a time crunch, so I feel like mine turned out not as good as it could have. I'd recommend using safety eyes for the black part of the eyes, as well as embroidery thread instead of yarn for the eyelashes, mouth, and glove lines.

Remember I said I was on a time crunch? I also didn't get a very good photo!

Pattern and photos are Copyright © 2012 Lillian Minneman - Just Stitched. Pattern shall remain free, and may not be reproduced or sold. Feel free to link to this pattern. Minnie Mouse is copyright her respective owners. No copyright infringement intended.

Minnie Mouse is made in the continuous round. Please read the pattern in full before beginning. Feel free to contact me for any questions.

Materials:
G/4.25mm Hook
H/5.00mm Hook
WW yarn in white
WW yarn in black
WW yarn in red
WW yarn in yellow
12mm Safety Eyes (Optional)
Black Embroidery Thread (Optional)

Head: in black
Round 1: 8sc in Magic Circle (8)
Round 2: 2sc in each st (16)
Round 3: *2sc in next st, sc in next st* (24)
Round 4: *2sc in next st, sc in next 2 st* (32)
Round 5: *2sc in next st, sc in next 3 st* (40)
Round 6: sc around (40)
Round 7: sc around (40)
Round 8: sc around (40)
Round 9: sc around (40)
Round 10: sc around (40)
Round 11: *dec, sc in next 7 st* (32)
Round 12: sc around (32)
Round 13: sc around (32)
Round 14: sc around (32)
Round 15: sc around (32)
Round 16: sc around (32)
Round 17: *dec, sc in next 2 st* (24)
Round 18: *dec, sc in next st* (16)
Stuff now, if you haven't started already.
Round 19: *dec, sc in next 2 st* (12)
Continue in black for neck.
Round 20: sc around (12)
Round 21: sc around (12) Switch to red in last sc.
Continue in red for body.
Round 22: 2sc in each st (24)
Round 23: sc around (24)
Round 24: sc around (24)
Round 25: sc around (24)
Round 26: sc around (24)
Round 27: sc around (24)
Round 28: sc around (24)
Round 29: sc around (24) Switch to white in last sc.
Round 30: sc around in BLO (24)
Round 31: sc around (24)
Round 32: sc around (24)
Round 33: *dec, sc in next st* (16)
Round 34: *dec, sc in next 2 st* (12)
Slst in 6th sc from hook.
Round 35: sc around (7)
Round 36: 2sc in FLO of each around (14) f/o, weave in end.
Attach white yarn to 2nd leg area.
Repeat Rounds 35 & 36.

Skirt: in red
Attach red yarn in free loop of round 30.
Round 1: 2sc in each st (48)
Round 2: sc around (48)
Round 3: sc around (48)
Round 4: sc around (48)
Round 5: sc around (48)
Round 6: sc around in FLO (48)
f/o, weave end in.

For ruffles, in white, attach yarn in any FLO of Round 6.
3sc in each stitch around. F/O, weave end in.

Legs: in black
Attach black yarn to free loop of Round 36.
Round 1: sc around (7)
Round 2: sc around (7)
Round 3: sc around (7)
Round 4: sc around (7)
Round 5: sc around (7)
Round 6: sc around (7)
Round 7: sc around (7)
Round 8: sc around (7)
Round 9: 2sc in next 2st, sc in next 2st, 2sc in next 2st. (10)
Round 10: 2sc in next 4st, sc in next 6st. (14) Change to yellow in last sc.
Stuff.
Continue on for foot. Note: I am personally unhappy with the feet, and plan to revisit this at a later date. Feel free to leave in the comments what YOU do for the feet, or you may follow the pattern.
Round 11: sc in next st, HDC in next 3st, sc in next 10 st (14)
Round 12: Repeat Round 11.
Round 13: sc in next 2 st, HDC in next, DC in next, HDC in next, sc in next 9. (14)
Round 14: dec around (7)
f/o, leaving tail. weave tail through last round, pull tight, weave end in.
Repeat 1-14 for second leg.

Hands: in white
Round 1: sc 8 in magic circle (8)
Round 2: sc around in BLO (8)
Round 3: *2sc in next st, 1sc in next st* (12)
Round 4: sc around (12)
Round 5: sc around (12)
Round 6: slst in 4th st from hook, sc around hand (slip stitch + 8sc)
Round 7: sc aroun (8)
Stuff.
Round 8: dec around (4)
f/o, weave end through last round, pull tight, weave in tail.

Thumb:
Attach white yarn to thumb area.
1. sc around (5)
f/o, weave end through last round, pull tight, weave in tail.

Glove Roll:
Attach white to free loop of round 2.
1. sc around (8)
2. *2sc in next st, 1sc in next st* (12)
f/o, weave in end.

Arms: in black
Attach yarn to magic circle round of hand.
Round 1: sc around (7)
Round 2: sc around (7)
Round 3: sc around (7)
Round 4: sc around (7)
Round 5: sc around (7)
Round 6: sc around (7)
Round 7: sc around (7) switch to red in last sc.
Round 8: *3sc in next st, slst in next st* (12) + sc in next st (13 total)
Round 9: sc in BLO of all sc's from previous round (10)
Round 10: *2sc in next st, sc in next st* (15)
Round 11: sc around (15)
Round 12: *dec, sc in next 3st* (12)
Round 13: dec around (6)
Stuff.
f/o, leave long tail for sewing. Weave tail through last round, pull tight.

Ears: in black
Round 1: HDC 8 in Magic Circle (8)
Round 2: 2HDC in each (16)
Round 3: *2HDC in next st, 1HDC in next st* (24)
f/o, leave long tail for sewing.

Face: in tan
Round 1: 8sc in magic circle (8)
Round 2: 2sc in each (16)
Round 3: *2sc in next st, sc in next st* (24)
Round 4: *2sc in next st, sc in next 2 st* (32)
Round 5: *2sc in next st, sc in next 3 st* (40)
Round 6: 3HDC in next st, 2HDC in next st, slst in next st, sc in next st, 2HDC in next st, 3HDC in next st, sc in next 7st, 2HDC in next st, 3HDC in next st, 2HDC in next st, HDC in next 11st, 2HDC in next st, 3HDC in next st, 2HDC in next st, sc in next 7. Slst to beginning of round
Leave long tail for sewing.

Snout: in tan
Round 1: 8sc in magic circle (8)
Round 2: *2sc in next st, sc in next st* (12)
Round 3: sc around (12)
Round 4: sc around (12)
f/o, leave tail for sewing.

Nose: in black
Round 1: sc 4 in magic circle (4)
Round 2: sc around (4)
Round 3: sc around (4)
f/o, leave tail for sewing.
Sew to snout.

Eyes: in white
Round 1: sc 4 in magic circle (4)
Round 2: *2sc in next st, 1sc in next st* (6)
Round 3: *sc in next st, 2sc in next st, sc in next st* (8)
f/o, leave tail for sewing.

Pupils (if not using safety eyes): in black
Round 1: sc 4 in magic circle (4)
Pull tight. f/o, leave tail for sewing.
Sew to eye whites.

Bow: in red, with H/5.00mm hook.
Row 1: Chain 17.
Row 2: HDC across (15) chain 2, turn.
Row 3: Repeat Row 2.
Row 4: Repeat Row 2.
Row 5: Repeat Row 2.
f/o, weave end in.

Fastener: in red
Row 1: Chain 11
Row 2: sc across (10)
F/o, leave long tail for sewing.
Sew fastener together once wrapped around bow, sew in each sc to secure.

Assembly & Details:
I highly recommend pinning everything in place before sewing - esp the face! I didn't, but I wish I would have. I also forgot to make note of what round I positioned everything, so just pin them til you like where they go.
1. Sew face to head.
2. Sew ears to head.
3. Sew snout/nose to face.
4. Sew eyes to face.
5. Sew Bow between Ears, or in front of one ear. (I put mine in front of one ear.)
6. Tail: chain desired number of stitches, attach under the skirt in the rear.

After face, eyes, and snout are attached, embroider 3 eyelashes on the upper outside of each eye using black embroidery thread, or black yarn. Embroider 3 lines on the back of Minnie's gloves. You may even be able to embroider lines between her fingers, but I wasn't able to do that with WW yarn. (I tried, it did NOT look right at all!) Embroider mouth on face.

If I forgot anything, or anything doesn't make sense, please contact me!
Find me at:
http://www.facebook.com/pages/Just-Stitched/308561265852550
http://www.ravelry.com/people/LilyPants
http://juststitched.tumblr.com
http://juststitched.blogspot.com

Wednesday, June 20, 2012

Free Pattern: Mr. Clumsy

Can you tell I'm on a pattern-making/Mr. Men kick? I'm loving it! I'm having so much fun creating things on my own, and writing out the patterns as well! I hope you all are enjoying it, too! Here's Mr. Clumsy!


Pattern and photos are Copyright © 2012 Lillian Minneman - Just Stitched. Pattern shall remain free, and may not be reproduced or sold. Feel free to link to this pattern. MR. MEN™ LITTLE MISS™ Copyright © 2012 THOIP. No copyright infringement intended.

Mr. Clumsy is made in the continuous round. Please read the pattern in full before beginning. Feel free to contact me for any questions.
Materials:
F/3.75mm Hook
WW yarn in green
WW yarn in black
WW yarn in orange WW yarn in yellow
12mm Safety Eyes (Optional)

Body: in Green
Round 1: In Magic Circle, sc 6. (6)
Round 2: 2sc in each st. (12)
Round 3: *2sc in next st, sc in next st* (18)
Round 4: *2sc in next st, sc in next 2 st* (24)
Round 5: *2sc in next st, sc in next 3 st* (30)
Round 6: *2sc in next st, sc in next 4 st* (36)
Round 7: sc around (36)
Round 8: sc around (36)
Round 9: sc around (36)
Round 10: sc around (36)
Round 11: sc around (36)
Round 12: sc around (36)
Round 13: sc around (36)
Round 14: sc around (36)
Round 15: *2sc in next st, sc in next 11 st* (39)
Round 16: sc around (39)
Round 17: sc around (39)
Round 18: sc around (39)
Round 19: sc around (39)
Round 20: sc around (39)
Round 21: *2sc in next st, sc in next 12 st* (42)
Round 22: sc around (42)
Round 23: *dec, sc in next 5 st* (36)
Round 24: sc around (36)
Round 25: *dec, sc in next 4 st* (30)
Round 26: *dec, sc in next 3 st* (24)
Round 27: *dec, sc in next 2 st* (18)

Count 9st over and slst for positioning of eyes/nose/etc. (Remove slst.)
Place safety eyes at row 8, with two stitches between them.
Eyes: in black: (if not using safety eyes)
In magic circle, sc 6. (4)

Nose: in yellow:
Round 1: Magic Circle 8
Round 2: 2sc in each st (16)
F/O, leave long tail for sewing.

Place top of nose 1 1/2 rows below eyes.

For Mustache: cut 3 strands of yarn, and attach all in one stitch just below nose (as you would a fringe on a scarf.)Separate strands of worsted yarn, and fray out for a messy 'stache.

Stuff body firmly.

Legs: in green
sc in 9th st from hook.
Round 28: sc around (10)
Round 29: sc around (10)
Round 30: sc around (10)
Round 31: sc around (10)
F/O, weave end in.
Repeat R28-31 for second leg.
Stuff legs firm.
Arms in green
Round 1: In Magic Circle, sc 8. (8)
Round 2: sc around (8)
Round 3: sc around (8)
Round 4: sc around (8)
Round 5: sc around (8)
f/o, leave long tail for sewing.

Fingers: in green
Flatten arm, attach yarn with slst on outer edge of where you began (at the magic circle).
*ch4, slst in same st as attached, slst in next st on arm.*
repeat until you have made 4 fingers total.
F/O.

Boots: in orange
Round 1: In Magic Circle, sc 8. (8)
Round 2: 2sc in each st (16)
Round 3: sc around (16)
Round 4: *dec, sc in next 6 st* (14)
Round 5: sc around (14)
Round 6: sc around (14)
Round 7: sc in next 10 st (10), ch1 & turn
Round 8: sc in next 10 st (10), ch1 & turn
Round 9: sc in next 10 st (10), ch1 & turn
Round 10: *sc in next 2 st, dec* (8) ch1 & turn
Round 11: *dec, sc in next 2 st* (6) ch1 & turn
Round 12: sc, dec, dec, sc (4) ch1 & turn
Round 13: dec, dec (2) ch1 & turn
Round 14: sc evenly to front (3), sc in FLO of front (4), sc evenly (3), dec (1) [11 total st]
f/o, leave long tail for sewing.

For hair: take 8 long strands of black yarn, and attach to top of head as you would a fringe on a scarf, around the first ring you made. Separate strands of yarn, and "style" as you see fit. (Tip: Make the strands extra long. You can always cut more off if you need to!)

For shoelaces: attach 1 small length of black yarn to the top of each shoe.

Assembly:
Sew top of arms to round 14.
Sew boots to bottom of legs, toes pointing outward.
To finish, embroider on his mouth, using black yarn and a yarn needle.

Find me at:
http://www.facebook.com/pages/Just-Stitched/308561265852550
http://www.ravelry.com/people/LilyPants
http://juststitched.tumblr.com
http://juststitched.blogspot.com
Sunday, June 17, 2012

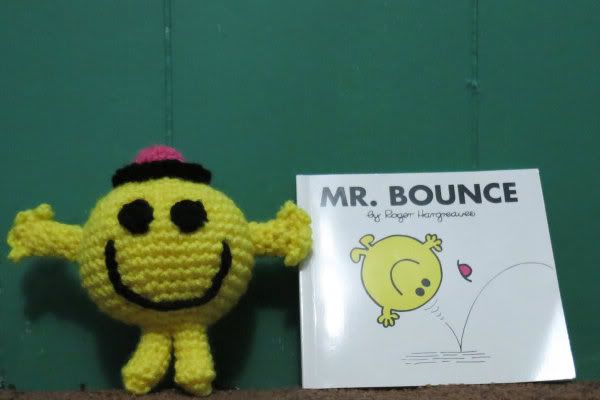
Free Pattern: Mr. Bounce

In Grade School, I remember every time we went down to the library, I'd check out a Mr. Men or Little Miss book by Roger Hargreaves. I loved them so much! While I was pregnant with my daughter in 2009, I was seeing Little Miss and Mr. Men stuff everywhere - even a show on Cartoon Network! I got a bunch of Mr. Men books and dolls and such for Christmas after she was born, and, while my daughter liked them, she didn't really show much interest in them until recently. She's all about Mr. Men right now! She always has to gather up all the dolls while we read the books or watch the show together.

I decided I was going to try my hand at making another pattern, since I couldn't find any patterns already made. So, here's Mr. Bounce!


Pattern and photos are Copyright © 2012 Lillian Minneman - Just Stitched. Pattern shall remain free, and may not be reproduced or sold. Feel free to link to this pattern. MR. MEN™ LITTLE MISS™ Copyright © 2012 THOIP. No copyright infringement intended.

Mr. Bounce is made in the continuous round. Body and legs are made in one piece, so there are less parts to sew on. Please read the pattern in full before beginning. Feel free to contact me for any questions.

Materials:
F/3.75mm Hook
WW yarn in yellow
WW yarn in black
WW scrap yarn in pink.
Safety Eyes (Optional)

Body
Round 1: In magic circle, sc 6. (6)
Round 2: 2sc in each st. (12)
Round 3: *2sc in next st, sc in next st* (18)
Round 4: *2sc in next st, sc in next 2 st* (24)
Round 5: *2sc in next st, sc in next 3 st* (30)
Round 6: *2sc in next st, sc in next 4 st* (36)
Round 7: *2sc in next st, sc in next 5 st* (42)
Round 8: sc around (42)
Round 9: sc around (42)
Round 10: sc around (42)
Round 11: sc around (42)
Round 12: sc around (42)
Round 13: sc around (42)
Round 14: *dec, sc in next 5 st* (36)
Round 15: *dec, sc in next 4 st* (30)
Round 16: *dec, sc in next 3 st* (24)
Round 17: *dec, sc in next 2 st* (18)
Stuff Firmly
Round 18: *dec, 1 sc in next 2 st* (9)
DO NOT F/O!!

Leg
Skip 4 st. SC in 5th st.
Round 19: sc around (7)
Round 20: sc around (7)
Round 21: sc around (7)
Round 22: sc around (7)
Round 23: sc in next 3 st, 2HDC in next 2 st, sc in next 2 st. (9)
Round 24: sc around (9)
Stuff.
Round 25: *dec, sc in next st* (6)
F/O, weave end through last round. Pull tight and weave end in.
Repeat Rounds 19-25 for second leg. Depending on where you attach your yarn, you may need to rearrange round 23 so that the HDCs are in the same spot as the first leg. For example, I did: sc in next 5 st, HDC in next 2 st, because that's where it lined up for me.

Arms:
Round 1: In magic circle, sc 6. (6)
Round 2: sc around (6)
Round 3: sc around (6)
Round 4: sc around (6)
Round 5: sc around (6)
Round 6: sc around (6)
F/O, leave long tail for sewing. Repeat for other arm.
Stuff lightly. (You may stuff after you add fingers, if you wish.)

Fingers:
Flatten arm, attach yarn with slst on outer edge of where you began (at the magic circle).
*ch4, slst in same st as attached, slst in next st on arm.*
repeat until you have made 4 fingers total.
F/O.

Hat:
Round 1: In magic circle, sc 6. (6)
Round 2: 2sc in each st. (12)
Round 3: sc around (12)
Round 4: sc around (12) switch to black.
Round 5: sc around in FLO (12)
Round 6: 2sc in both loops of each st. (24)

Eyes:
In magic circle, sc 6. (4)

Assembly: The HDC on the feet determine the front.
Sew arms on sides at round 9. The top of the arms should be sewn to round 8.
Sew eyes to round 9. The top of the eyes should be sewn to round 8.

To finish, embroider on his mouth, using black yarn and a yarn needle.

Find me at:
http://www.facebook.com/pages/Just-Stitched/308561265852550
http://www.ravelry.com/people/LilyPants
http://juststitched.tumblr.com
http://juststitched.blogspot.com

Friday, February 10, 2012

Stitch Cheat Sheet (Updated 8/24/13)

Sometimes I just lose my mind and can't remember how to do a stitch. These are my written instructions on each stitch.. If you find any mistakes, or would like to suggest a stitch, please leave me a comment. (I took the time to compile this list, and type everything out. Please do not copy and paste this list anywhere, but feel free to link back!) Like this? Share it! (Don't forget there are more share buttons at the bottom!)
Pin It Share on Tumblr


Basic Stitches
Chain Stitch (Abbreviation: ch)
Make a slip knot on your crochet hook. (1 loop on hook.) Yarn over. Pull through slip knot loop. You have just made one chain stitch.

Slip Stitch (Abbreviation: slst)
Insert hook into stitch (or chain). Yarn over, pull through stitch. Pull through first loop on hook. You have completed one slip stitch. (You should have 1 loop on your hook.)

Single Crochet (Abbreviation: sc)
Insert hook into chain (or stitch). Yarn over, pull through chain (or stitch). Yarn over, pull through both loops on hook. (You should have 1 loop on your hook.)

Half Double Crochet (Abbreviation: hdc)
Yarn over. Insert hook into stitch. Yarn over, pull through stitch. (3 loops on hook) Yarn over. Pull through all 3 loops. (You should have 1 loop on your hook.)

Double Crochet (Abbreviation: dc)
Yarn over. Insert hook into chain (or stitch.) Yarn over, pull through chain (or stitch). (You should have 3 loops on your hook.) Yarn over, pull through 2 loops. (You should have 2 loops on your hook.) Yarn over, pull through both loops. (You should have 1 loop on your hook.)

Extended Double Crochet (Abbreviation: edc)
Yarn over. Insert hook into chain (or stitch.) Yarn over, pull through chain (or stitch). (You should have 3 loops on your hook.) Yarn over, pull through ONE loop. (You should have 3 loops on your hook.) Yarn over, pull through 2 loops. (You should have 2 loops on your hook.) Yarn over, pull through both loops. (You should have 1 loop on your hook.)

Triple Crochet/Treble Crochet (Abbreviation: tr)
Yarn over 2 times. Insert hook into stitch. Yarn over, pull through stitch. (4 loops on hook.) Yarn over, pull through 2 loops. (3 loops on hook.) Yarn over, pull through 2 loops. (2 loops on hook.) Yarn over, pull through last 2 loops. (You should have 1 loop on your hook.)

Double Triple Crochet (Abbreviation: dtr)
Yarn over 3 times. Insert hook into stitch. Yarn over, pull through stitch. (5 loops on hook.) Yarn over, pull through 2 loops. (4 loops on hook.) Yarn over, pull through 2 loops. (3 loops on hook.) Yarn over, pull through 2 loops. (2 loops on hook.) Yarn over, pull through last 2 loops on hook. (You should have 1 loop on your hook.)

Decorative Stitches
Puff Stitch (Abbreviation: puff st)
Yarn over. Insert the hook into stitch. Yarn over, pull through stitch. Yarn over, pull through the 2 loops. (2 loops on hook.) Yarn over. Insert the hook into SAME stitch. Yarn over, pull through stitch. Yarn over, pull through 2 loops. (3 loops on hook.) Yarn over. Insert the hook into SAME stitch AGAIN. Yarn over, pull through stitch. Yarn over, pull through the 2 loops. (4 loops on hook.) Yarn over, pull through all 4 loops on hook. (You should have 1 loop on your hook.)

Popcorn Stitch (Abbreviation: 'pop' or 'pc')
Front Popping:
Make 5 Double Crochets into one stitch. Take your loop off the hook. Insert your hook from front to back under the top 2 loops of the first double crochet you made. Hook the dropped loop, and pull it through the stitch. (For Backward popping, instead of going from front to back in the loops of your first double crochet, you will go from back to front, and your popcorn stitch will pop towards the back.) You should have 1 loop on your hook.

V Stitch (Abbreviation: V st)
To create a V Stitch, do a double crochet in your stitch (or chain), chain one, then double crochet AGAIN in the SAME stitch as before.

Shell Stitch (Abbreviation: shell)
To create a shell stitch, do four double crochet in ONE stitch of the row below (or chain.)

Crossed Double Crochet Stitch (Abbreviation: crossed dc)
To create a crossed double crochet, skip one stitch (or chain) and make one double crochet in the next stitch. Make one double crochet in the stitch (or chain) you skipped. (You should have 1 loop on your hook.)

Picot Stitch (Abbreviation: p)
To create a picot stitch, chain 3. Insert hook into the first chain you made. Yarn over and draw through chain AND loop on hook. (You should have 1 loop on your hook.)

Cluster Stitch (Abbreviation: c, cl)
Yarn over, insert hook into stitch. Yarn over, draw through stitch. Yarn over, draw through 2 loops. (2 loops on hook.) Yarn over, insert hook into NEXT stitch. Yarn over, draw through stitch. Yarn over, draw through 2 loops. (3 loops on hook.) Yarn over, insert hook into NEXT stitch (this is the 3rd stitch you're working in.) Yarn over, draw through stitch. Yarn over, draw through 2 loops on the hook. (4 loops on hook.) Yarn over, insert hook into NEXT stitch (this is the 4th and final stitch you're working in.) Yarn over, draw through stitch. Yarn over, draw through 2 loops on the hook. (5 loops on hook.) Yarn over, and draw through all 5 loops. (You should have 1 loop on your hook.) You have created one 4-double-crochet cluster stitch.

Front Post Double Crochet (Abbreviation: fpdc)
Yarn over, insert your hook from front to back between the posts of the 1st and 2nd double crochet of the row below, and then from back to front between the posts of the 2nd & 3rd stitches. Yarn over, pull around the entire post. (3 loops on hook.) Yarn over, pull through 2 loops. (2 loops on hook.) Yarn over, pull through last 2 loops. (You should have 1 loop on your hook.)

Back Post Double Crochet (Abbreviation: bpdc)
Yarn over, insert hook from back to front between the posts of 1st & 2nd double crochet in the row below, and then from front to back again between the posts of the 2nd and 3rd stitches. Yarn over, pull through around post. (3 loops on hook.) Yarn over, pull through 2 loops. (2 loops on hook.) Yarn over, pull through last 2 loops. (You should have 1 loop on your hook.)

Reverse Single Crochet (aka 'crab stitch') (Abbreviation: rsc, reverse sc, crab st)
Working LEFT to RIGHT: Insert hook into chain (or stitch). Yarn over, pull through chain (or stitch). Yarn over, pull through both loops on hook. (You should have 1 loop on your hook.)

Feather Stitch (Abbreviation: None)
Insert your hook into the next stitch (starting stitch), and draw up a loop (two loops on hook.) Working in the row below, count two stitches to the right of the stitch below your starting stitch, insert hook, and draw up a loop (3 loops on hook). Working two rows directly below your starting stitch, insert hook, and draw up a loop (4 loops on hook). Working one row below, count two stitches to the left of the stitch below your starting stitch, insert hook, and draw up a loop (5 loops on hook). Yarn over, and draw a loop through all 5 loops on your hook. (1 loop should be left on your hook.)

Cable Stitch (Abbreviation: None)
Chain a multiple of 4+3. Single crochet in the 2nd chain from your hook, and in each chain across. Chain 3, turn. [Skip the next stitch, and double crochet in the next 3. Insert your hook (from front to back) in the stitch you skipped, and pull up a (very) loose loop. Yarn over, draw through both loops on your hook.] For consecutive rows of the Cable Stitch, you should put a row of Single Crochet between each cable stitch row, and repeat the instructions in brackets.

Basketweave Stitch (Abbreviation: None)
Chain a multiple of 4 (add 4 for to length for the turning chain). Double crochet in the 4th chain from your hook, and across to the end of the row. Chain 2, turn. [4 FPDC, 4 BPDC] across. Chain 2, turn. [4BPDC, 4FPDC] across.

Bullion/Roll Stitch  (Abbreviation: None)
Wrap yarn around widest part of your crochet hook 4-6 times (for beginners). Slide roll toward head of hook. Insert hook in stitch, yarn over, pull through stitch, yarn over, and with the head of your hook facing downward pull through all loops on hook. (1 loop left on your hook) Yarn over, pull through loop to lock in.
For video tutorial, see: http://youtu.be/ciaJwMW3Wys
For helpful tips about the Bullion Stitch, see: http://pwalker281.hubpages.com/hub/6-Tips-for-Making-the-Perfect-Crocheted-Bullion-Stitch
For another method of Bullion using a knitting needle as an aid, see: http://www.crochetspot.com/how-to-crochet-bullion-stitch/

Loop Stitch (Abbreviation: lp st)
Wrap the yarn from front to back over your index finger. Insert hook into next stitch, grab the looped yarn from behind your finger, and draw the yarn through the stitch. (2 loops on hook). Yarn over hook, and draw through both loops on hook. (1 loop made. You should have 1 loop left on your hook.)

Crocodile Stitch (Abbreviation: crocodile st, croc st)
Make a slip knot, and chain a multiple of 3. DC in 3rd chain from hook. (Ch2, skip 2 ch, 2 DC in one stitch) repeat until end of your chain. Ch3. Rotate your piece (do NOT turn!) Work 5DC around the post of the last DC your made. Ch 1, rotate so the opposite side is facing UP. 5DC around the post of your second DC. (This is completes one Crocodile Stitch.) Skip next set of 2DC's in one. Repeat the in the 3rd set of 2 DC's. Skip next set of 2 DC's. Repeat the crocodile stitch pattern in the next set of DC's.
For video instructions on the Crocodile Stitch, see: http://www.youtube.com/results?search_query=crocodile+stitch

Pineapple Stitch (Abbreviation: None)
Ch2. HDC in next st. *Yarn over, insert hook in to space between beginning chain and first HDC, yarn over, and pull through* 3 times total (7 loops on your hook). Yarn over, and draw through all loops on your hook. (1 loop left on hook.) chain 1. You have made one pineapple.
Consecutive Pineapples:
Skip next stitch to create a space. HDC in next st. In space created *Yarn over, insert hook into space, yarn over, and pull through* 3 times total (7 loops on your hook). Yarn over, and draw through all loops on your hook. (1 loop left on hook.) chain 1.]

Griddle Stitch (Abbreviation: None)
To begin, chain a multiple of 2+2
Row 1: In 4th ch from hook, sc in ch. Dc in next ch. *sc in next ch, dc in next ch* across.
Row 2: Ch3 (counts as first DC), turn. *sc in next dc, dc in next sc* across. Sc in top of first DC. (Repeat row 2)

Ridge Stitch (Abbreviation: None)
To begin, ch any number & hdc in 3rd ch from hook (or FHDC). Row 1: HDC across. Ch1, turn. Row 2: HDC in loop under the stitch (photos above) across. Ch1, turn. (Repeat row 2)
Tunisian Crochet
Tunisian Stitch (aka 'afghan stitch)
Foundation:
Forward Pass
Insert the hook in the second chain from the hook. Yarn over, draw through chain stitch. (2 loops on hook) Insert hook in the next chain and "yarn over, draw through chain" in each chain across the foundation chain. Your hook should now be loaded up with loops.
Return Pass
Yarn over and draw yarn through 1 loop on the hook FOR THIS ONE ONLY. Yarn over, draw yarn through the next 2 loops, repeating "yarn over, draw through 2" across the row until 1 loop remains on hook.
Consecutive Rows:
Forward Pass
Insert hook between the front and back strands of previous vertical stitches. Yarn over, draw up loop. (2 loops on hook). Continue with this until you reach end of the row, then insert your hook under the last 2 vertical bars. Your hook should be loaded up with loops.
Return Pass
Performed as foundation return pass. Be sure to draw through one loop ONLY ON THE FIRST. Draw through 2 through the rest of the row until one loop remains on hook.

Tunisian Purl Stitch (aka 'purl stitch')
Foundation: Performed same as Tunisian Stitch (see above)
Consecutive Rows:
Forward Pass
With the index finger of your 'yarn hand', bring the working yarn to the front of work; insert hook under the next vertical stitch. Keep your hook behind the strand of working yarn. Yarn over, draw up loop. (2 loops on hook). Continue with this until you reach end of the row, then insert your hook under the last 2 vertical bars. Your hook should be loaded up with loops.
Return Pass Performed same as Tunisian Stitch (see above)

Tunisian Stockinette Stitch (aka 'knit stitch)
Foundation: Performed same as Tunisian Stitch (see above)
Consecutive Rows:
Forward Pass
Insert the hook between the front and back strands of the next stitch. Yarn over, draw up loop. (2 loops on hook. Continue with this until you reach end of the row, then insert your hook under the last 2 vertical bars. Your hook should be loaded up with loops.
Return Pass Performed same as Tunisian Stitch (see above)

Filet Crochet
Net Stitch (Not technically Filet Crochet unless it's used to make patterns)
Make a foundation chain of 3+5.
Row 1: DC in the 8th stitch from your hook. *Chain 2, DC in 3rd chain from previous stitch.* Repeat ** across.
Row 2: Turn, chain 5, and DC in 2nd to last DC made in previous row. Repeat ** across.

Lacet
Double Crochet. Chain 3, skip next two stitches. Single Crochet, Chain 3, skip next two stitches. Double Crochet.

Bar
Double Crochet. Chain 5, skip next 5 stitches. Double Crochet.


Find me at:
http://www.facebook.com/pages/Just-Stitched/308561265852550
http://www.ravelry.com/people/LilyPants
http://juststitched.tumblr.com
http://juststitched.blogspot.com

Monday, January 30, 2012

Free Pattern: Beanie with Bill [Original]

A lot of people noted that the pattern for this ran a little small. Please see the rewritten version here.
Beanie with Bill, Chunky.
By Lily M.

Materials:
Super Bulky Yarn (Lion Brand Wool-Ease® Thick & Quick®)
K Hook

Notes: Count Ch2 as 1st DC in each round.

Beginning: IN MC, CH2 (Counts as 1st DC), DC 9 (10DC). Pull tight to close. SlSt in top of Ch2.
Round 1: Slst in next DC, Ch2. DC in same st as CH2. 2DC around. (20DC) Slst in top of Ch2.
Round 2: Slst in next DC, Ch2. DC in same st as Ch2, DC in next st. *2DC in next, 1DC in next* around. (30DC) Slst in top of Ch2.
Round 3: Slst in next DC, Ch2. DC in same st as Ch2, DC in next 2 sts. *2DC in next, 1DC in next 2st* around. (40DC) Slst in top of Ch2.
Round 4: Slst in next DC, Ch2. DC around (40st) Slst in top of Ch2.
Round 5: Slst in next DC, Ch2. DC around (40st) Slst in top of Ch2.
Round 6: Slst in next DC, Ch2. DC around (40st) Slst in top of Ch2.
[Stop here for 0-12mo, Skip to Brim.]
Round 7: Slst in next DC, Ch2. DC around (40st) Slst in top of Ch2.
Round 8: Slst in next DC, Ch2. DC around (40st) Slst in top of Ch2.
[**Untested** Stop here for 12mo-4yr, Skip to Brim.]
Round 9: Slst in next DC, Ch2. DC around (40st) Slst in top of Ch2.
Round 10: Slst in next DC, Ch2. DC around (40st) Slst in top of Ch2.

Infant/Child Brim:
Row 1: CH2, DC in FLO in next 9 ST. (10DC) SlSt in next st, Turn. (Do not ch.)
Row 2: *DC in st, 2DC in in next* Repeat 3 times, DC in next 2, SLst in next, SlSt down side of 1 st, slst in next st (last round of hat).

Adult Brim:
Row 1: CH2, DC in FLO in next 14 ST. (15DC) SlSt in next st, Turn. (Do not ch.)
Row 2: *DC in st, 2DC in in next* Repeat until end (21DC), SLst in next, Turn. (Do not ch.)
Row 3: DC across. (19DC) SlSt in last st. SlST down side (2 st), slst in next st (last round of hat).

Find me at:
http://www.facebook.com/pages/Just-Stitched/308561265852550
http://www.ravelry.com/people/LilyPants
http://juststitched.tumblr.com
http://juststitched.blogspot.com
Friday, January 6, 2012

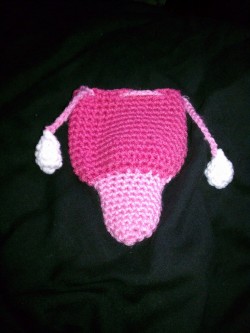
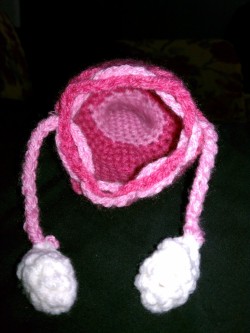
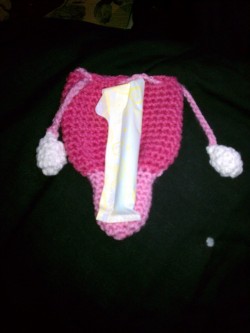
Free Pattern: Uterus Drawstring Bag

Perfect for storing feminine hygiene products while on the go (Tampax Pearl Shown), or as a gag gift for new or expecting mothers!

Uterus Drawstring Bag   Download the pdf here!

Pattern and photo are copyright 2012 Lillian Minneman - Just Stitched. All rights reserved. If you plan to sell this item, please provide a link back to the pattern or credit the designer.

Like this?? Share it!
Pin It Share on Tumblr

Materials:
Hook H
Worsted Weight Yarn in Light Pink, Dark Pink, White
Yarn Needle

Key:
Color 1: Light Pink
Color 2: Dark Pink
Color 3: White

Vagina” Color 1/Light Pink
Round 1: Magic Circle 6 (6)
Round 2: 2sc in each st (12)
Round 3: [2sc in stitch, 1sc in next stitch] (18)
Rounds 4-12: sc in each stitch - 18

Uterus” Switch to Color 2/Dark Pink
Round 13: [2sc in stitch, 1sc in next stitch] - 27
Round 14: 1sc in next stitch, [2sc in stitch, 1sc in next stitch] 13 times (40)
Rounds 15-16: 40
Round 17: sc in next 4 st, [Sc2tog, Sc in next 4]6 times (34)
Round 18-25: Sc around – 34
Round 26: Ch2, sk2, Sc in 2 st, [ch2, sk2, sc in 3 st] around.] F/O
(Note: You may want to add another round of plain or decorative stitch above round 26.)

Ovaries” Make 2 in Color 3/White
Round 1: Magic Circle 4
Round 2: 2sc in each (8)
Rounds 3-4: Sc around (8) Stuff, if desired.
Round 5: 1 sc, sc2tog (4)
Round 6: sc2tog around. Leave tail for sewing.

Drawstring “Fallopian Tube” in Color 1/Light Pink
Chain 70. Attach one Ovary to end.
Weave other end in & out through last round of Uterus, ending with one end across from the other. Attach Ovary to other end.
Weave in ends.
Find me at:
http://www.facebook.com/pages/Just-Stitched/308561265852550
http://www.ravelry.com/people/LilyPants
http://juststitched.tumblr.com
http://juststitched.blogspot.com

Wednesday, January 4, 2012

Free Pattern: Crocheted Nook Simple Touch Cover

Pattern and photo are copyright 2012 Lillian Minneman - Just Stitched. All rights reserved. If you plan to sell this item, please provide a link back to the pattern or credit the designer.
Materials: H/8/5.00mm Hook
Worsted Weight 4-Ply Cotton
Yarn Needle
Scissors
1 or 2 Medium-Large size buttons
Sewing Needle & Thread
Washer, Dryer
Any Embellishments
Washing Machine, Dryer

Stitches Used: (U.S. Terms)
Half Double Crochet: Yarn over. Insert hook into stitch. Yarn over, pull through stitch. (3 loops on hook) Yarn over. Pull through all 3 loops. (You should have 1 loop on your hook.
Triple Crochet: Yarn over 2 times. Insert hook into stitch. Yarn over, pull through stitch. (4 loops on hook.) Yarn over, pull through 2 loops. (3 loops on hook.) Yarn over, pull through 2 loops. (2 loops on hook.) Yarn over, pull through last 2 loops. (You should have 1 loop on your hook.)
Double Triple Crochet: Yarn over 3 times. Insert hook into stitch. Yarn over, pull through stitch. (5 loops on hook.) Yarn over, pull through 2 loops. (4 loops on hook.) Yarn over, pull through 2 loops. (3 loops on hook.) Yarn over, pull through 2 loops. (2 loops on hook.) Yarn over, pull through last 2 loops on hook. (You should have 1 loop on your hook.)

Notes:
Work in continuous rounds until 20b.
Cover will be bigger than your Nook Simple Touch as you work it, to allow for shrinkage when washed & dried. If you do not plan to wash/dry (or are using yarn that doesn't shrink), start using 4 or 5 fewer chains and adapt pattern as you see fit.

Pattern:
Chain 20
Round 1: HDC in first back bump, and next 18 across, 3HDC in last bump. (22HDC)
Going down other side of chain, HDC in each across, 3HDC in last st (21HDC)
Place your marker, so you will know which side begins a new round.
Rounds 2-20a: HDC around (43)

Begin Working in rows.
20b: HDC to the end of the row (19), chain 2, turn.
Rows 1-7: HDC across (19), chain 2, turn

In row 8, you will create your buttonholes. (If you'd like any.)
If your buttons are on the larger side, do a double-triple crochet instead of a triple crochet.
Row 8 for two buttonholes: HDC 5, TC 2, HDC 5, TC 2, HDC 5
Row 8 for one buttonhole: HDC 8, TC 3, HDC 8
F/O, weave in ends.

Wash on cold, dry regular (with heat.)
Once dry, sew button(s) in appropriate place. Embellish as desired.

Embellishment Ideas:
Thread a ribbon through the 2nd row of stitches at the top.
Add an applique.
Add a decorative stitch around the flap.

Other ideas:
Add a short strap for a child-size purse!
Add two straps for a child-size backpack!

Find me at:
http://www.facebook.com/pages/Just-Stitched/308561265852550
http://www.ravelry.com/people/LilyPants
http://juststitched.tumblr.com
http://juststitched.blogspot.com